Formly File Uploads and Fu Man Brew

(Phew, well that took awhile. I have been working on the following blog post for a year now. Work has been insane, and this has been the longest post to date by far. Hopefully this is the end of a long hiatus!)
Recently, I was required to incorporate local file uploads, Google Drive, and Dropbox into a form in order to upload a file as a part of the form data. While I have done similar things before with basic HTML forms and Angular, figuring out how to add these options in Formly was not necessarily hard, but there are a few "gotchas", especially with Google Drive and local file browsing.
While there are numerous ways to achieve integration with Formly, the best way I have found is to have a separate upload module which is referenced in the main application module. To avoid using $scope.$emit and $scope.$broadcast, which are unreliable and hard to make reusable, I went the route of writing a shared data service, which allowed me to manipulate data and share it between directives without having a direct dependency between the two.
While having a data service may not be the simplest answer, implementing the solution this way allows more robust and reusable code. For now, let's take a closer look at the upload module. I created a module for upload that included individual directives for providers such as local file browse, Dropbox, and Google Drive.
In the case of the Dropbox Directive, I looked around online, but did not find anything I liked out of the box, so I wrote my own. You can find my simple directive on my public Github repo: https://github.com/silverelizard/angular-dropbox-module. The directive could use some sprucing up, but feel free to use as-is or modify at your leisure.
I was in a similar situation with the Google Drive directive. I wanted to pass a direct link and access token to my form post action in order to make authorized GET request for the file contents. Most of the directives I found did not do this, so I ended up using is a tweaked version of the one found here https://github.com/softmonkeyjapan/angular-google-picker. I could also have used the directive as is, and made the drive request to get the download link and access token on the server side, but wanted to off-load as much of the work to the client-side as possible.
The last piece I added to my file upload directive is a popular local file browsing directive called ng-upload written by Daniel Farid, available on his GitHub at https://github.com/danialfarid/ng-file-upload. Many many people have asked me about how to interface ng-upload with Formly, and I will attempt to demonstrate the method I have found for implementing file uploads in a useful and descriptive manner.
Shared Data Service
The first step in implementing my approach to file uploads is implementing a shared data service in order to communicate between the Formly directive and the file upload directive within the application module. The service is extremely basic, and simply provides getter and setter methods for data to be stored and shared:
(function ServiceAppModule() {
  angular
    .module('services', []);
})();
(function SharedDataServiceModule() {
  angular
    .module('services')
    .factory('sharedDataService', sharedDataService);

  function sharedDataService() {
    var _data = {};
    return {
      getData: getData,
      getProperty: getProperty,
      setProperty: setData,
      deleteProperty: deleteProperty
    };

    function getData() {
      return _data;
    }

    function getProperty(name) {
      return typeof(_data[name]) === 'undefined' ? null : _data[name];
    }

    function setData(name, value) {
      _data[name] = value;
      return _data;
    }

    function deleteProperty(name) {
      if(typeof(_data[name]) !== 'undefined') {
        delete _data[name];
      }
      return _data;
    }
  }
})();
Note: I input a generic services module name for ease of use in my examples, but best practice is generally to segregate your pieces of functionality into features. For example, in the application I was working on, the service was added to a profile.services module, because it was related to profile feature and provided a service. This allows greater modularity of code, and easier reuse across multiple modules. For more information on these kinds of best practices, check out John Papa's Angular Style Guide.
Now we can use the shared data service between the different directives in the application module and their controllers. Let's imagine the overall structure of the application:
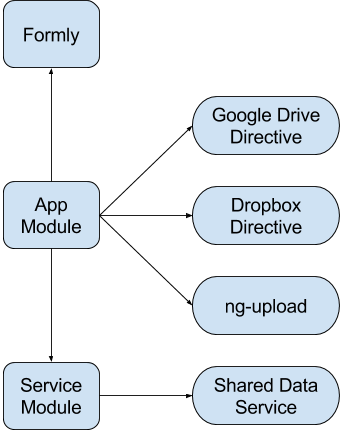
Note: In a production environment, I would also abstract the Formly form into its own directive, but I find this unnecessary for this example.
My application module contains the injection of the different necessary modules and configuration of their setting providers. While most of this information is in the individual directives, here is how the module should look for a basic application following the structure in the figure above:
(function AppModule(googleCredentials) {
  "use strict";

  angular
    .module('app', ['services', 'lk-google-picker', 'dropbox-picker', 'ngFileUpload', 'formly'], FormlyConfig)
    .config(['lkGoogleSettingsProvider', function(lkGoogleSettingsProvider) {
      lkGoogleSettingsProvider.configure({
        apiKey   : googleCredentials.apiKey,
        clientId : googleCredentials.clientId,
        scopes   : ['https://www.googleapis.com/auth/drive.readonly'],
        locale   : 'en',
        features : [''],
        views    : ['DocsView().setMimeTypes("application/pdf")']
      });
    }])
    .config(['DropBoxSettingsProvider', function(DropBoxSettingsProvider) {
      DropBoxSettingsProvider.configure({
        linkType: 'direct',
        multiselect: false,
        extensions: ['.pdf']
      });
    }])
    .config(['formlyConfigProvider', function(formlyConfigProvider) {
      formlyConfigProvider.setType(
      {
        name: 'input',
        templateUrl: 'input.html'
      });
    }]);
})(googleCredentials);
The above module definition configures the directives being used, including Formly, Google Picker, and Dropbox. Now we can write our file upload directive and our form directive, along with their respective controllers.
Let us first take a look at the the upload directive and its controller.
(function UploadDirectiveModule() {
  "use strict";

  angular.module('app')
    .directive('upload', Upload);

  function Upload() {
    return {
      scope: true,
      restrict: 'E',
      controller: 'uploadController',
      controllerAs: 'vm',
      templateUrl: 'upload.html',
      bindToController: true
    };
  }
})();
(function UploadControllerModule() {
  "use strict";

  angular.module('app')
    .controller('uploadController', UploadController);

  UploadController.$inject = ['sharedDataService'];

  function UploadController(sharedDataService) {
    var vm = this;
    \\TODO: create logic here
  }
})();
The above code sets up the directive we can use to manage our file upload experience. The only piece we have yet to look at is the upload.html template mentioned in the directive. Hold on! We are getting there. The basic experience we want are three different buttons, one for each file upload option. Let's start with our local file option using the ngFileUpload directive:
<script type="text/ng-template" id="upload.html">
  <h3>Upload a File</h3>
  <ul id="upload-actions">
    <li id="file-action">
      <button type="button" id="filecontainer"
        ngf-select="vm.fileUploaded($files)"
        ngf-multiple="false">
          Local File
      </button>
    </li>
  </ul>
</script>
Voila! We have a template to use with our directive. Notice we are making a callback to vm.fileUploaded when the user selects a file using ngFileUpload. We also specified ngf-multiple = "false" to ensure the user can only select one file. The other options for ngFileUpload can be found in the Full Reference section of the project's README.
Now we must write the vm.fileUploaded reference into our previously defined controller (only the controller function itself will be shown from now on).
function UploadController(sharedDataService) {
  var vm = this;
  vm.fileUploaded = fileUploaded;

  function fileUploaded(files) {
    if(typeof(files.length) !== 'undefined' && files.length > 0) {
      sendFileToSharedData('file', files[0]);
    }
  }

  function sendFileToSharedData(type, file) {
    sharedDataService.setProperty('file', file);
    sharedDataService.setProperty('fileType', type);
  }
}
So what have we done now? First, we have written a function called sendFileToSharedData to handle storing our file upload data in a way the data can be accessed from other isolated scopes within our application. Second, we have defined vm.fileUploaded as a function called fileUploaded. Simple, right?
Now, when a user selects a file, the fileUploaded function is executed. The function makes sure the file array returned from the ngFileUpload directive has length and length is greater than 0. If so, the file is pushed into our shared data service to be consumed later.
Now, before we add our other options, we may want to consider giving the user a way to remove the file and select a different one. Let's add some HTML to our template to facilitate this:
<script type="text/ng-template" id="upload.html">
  <div ng-hide="vm.file()">
    <h3>Upload a File</h3>
    <ul id="upload-actions">
      <li id="file-action">
        <button type="button" id="filecontainer"
          ngf-select="vm.fileUploaded($files)"
          ngf-multiple="false">
            Local File
        </button>
      </li>
    </ul>
  </div>
  <div ng-show="vm.file()" id="filename">
    <strong>Selected File:</strong>: {{ vm.file().name }}
    <button ng-click="vm.removeFile()" type="button">
      Remove File
    </button>
  </div>
</script>
Now we have a new section of our template which hides until vm.file() exists. We are also now hiding the upload dialog if a file is present. A simpler implementation would be telling the user what file they have selected and just overwriting when the user chooses another. Next, we need to implement two functions we have added: vm.file() and vm.removeFile().
function UploadController(sharedDataService) {
  var vm = this;
  vm.fileUploaded = fileUploaded;
  vm.file = getFile;
  vm.removeFile = removeFile;

  function getFile() {
    return sharedDataService.getProperty('file');
  }

  function removeFile() {
    sharedDataService.deleteProperty('file');
    sharedDataService.deleteProperty('fileType');
  }

  function fileUploaded(files) {
    if(typeof(files.length) !== 'undefined' && files.length > 0) {
      sendResumeToSharedData('file', files[0]);
    }
  }

  function sendFileToSharedData(type, file) {
    sharedDataService.setProperty('file', file);
    sharedDataService.setProperty('fileType', type);
  }
}
Essentially we just added a getter for the shared data service and way to remove values as well. Now a user can choose a file and remove a file. Next, let's integrate our new upload directive with our yet-to-be-written Formly controller! Normally, as mentioned before, I would create a separate directive for my Formly form, but in the name of brevity, I will make use of the dreaded ng-controller. Be aware you should never do this in a production application, but only for rapid prototyping (if even then). Alright, so let's look at our HTML for our page:
<div ng-controller="formController as vm">
  <form name="vm.form" novalidate>
    <formly-form model="vm.answers" fields="vm.questions"></formly-form>
    <upload></upload>
    <button type="submit" ng-click="vm.submit()">Submit</button>
  </form>
</div>
Here we are declaring the formly-form directive and our custom upload directive. We are also setting up the scope for our controller called formController which we have yet to create. The controller we need to construct will be responsible for the communication with the sharedDataService, and thus the upload directive. Here is the basic setup including definition our formly model and fields:
(function FormControllerModule() {
  "use strict";

  angular.module('app')
    .controller('formController', formController);

    formController.$inject = ['sharedDataService'];

    function formController(sharedDataService) {
      var vm = this;
      vm.answers = {};
      vm.submit = submit;
      vm.questions = [{
        key: 'email',
        type: 'input',
        templateOptions: {
          type: 'email',
          label: 'Email address',
          placeholder: 'Enter email'
        }
      }];

      function submit() {
        if(sharedDataService.getProperty('file')) {
          //TODO: Decided what to do with data
        }
      }
    }
})();
The final step in all of this is now looking at the sharedDataService and validating the upload as you see fit before submission. If its simply a case of checking if a file has been uploaded, just put code inside the if statement above. You can see the working ng-upload with formly in my Plunkr here: https://plnkr.co/Cuv64GDb5MK4qQIWf0gC.
Finally, in closing, I would like to talk about my favorite warm weather brew from Monday Night Brewing in Atlanta. Fu Manbrew is a super tasty wheat beer with a hint of spice from ginger and citrusy lemongrass flavor. I always have some of this around during the hot summer in ATL.